文章目录
在上一篇《处理 .DS_Store》里我提了一下使用 Git 来管理项目,Git 是一款分布式版本控制软件,使用它可以很方便的进行团队协作,对项目每次提交的版本进行操作等等。
但今天我记录的重点并不是关于 Git 的,而是与之息息相关的 GitHub 这个平台。众所周知,GitHub 是一个在线软件源代码托管服务平台,使用 Git 作为版本控制软件。同样的平台有不少,如 GitLab、Bitbucket、Gitee、Coding 等等,但最为流行的还是 GitHub。
无论是 Git 还是 GitHub,如果要说清楚并不是简单几句就可以的。因此在本文就不过多介绍了,有机会我会详细更新与之相关的文章内容。
场景说明
手上有两个项目在使用 Github Actions 来进行线上构建,平时只需提交源码到仓库特定分支即可触发线上构建任务。当构建完成并生成最终的软件包后便直接通过 Rsync 来传输到云服务器上运行。
案例实操
因为项目协议的原因,案例为个人测试使用 Github Actions 构建 Hugo 静态博客并推送到 VPS 的 Workflows 方法。
首先在 Hugo 根目录创建一个配置文件,路径为:项目根目录/.github/workflows/hugo.yml。路径必须遵守,配置文件的名字可以随意。
配置如下:
# This is a basic workflow to help you get started with Actions

name: Build Hugo Page

# Controls when the workflow will run
on:
  # Triggers the workflow on push or pull request events but only for the "main" branch
  push:
    branches: [ "main" ]

  # Allows you to run this workflow manually from the Actions tab
  workflow_dispatch:

# A workflow run is made up of one or more jobs that can run sequentially or in parallel
jobs:
  # This workflow contains a single job called "build"
  build:
    # The type of runner that the job will run on
    runs-on: ubuntu-latest

    # Steps represent a sequence of tasks that will be executed as part of the job
    steps:
      - uses: actions/checkout@v4
      - uses: webfactory/[email protected]
        with:
          ssh-private-key: ${{ secrets.BLOG_DEPLOY_KEY }}

      - name: Hugo setup
        # You may pin to the exact commit or the version.
        # uses: peaceiris/actions-hugo@2e89aa66d0093e4cd14751b3028fc1a179452c2e
        uses: peaceiris/actions-hugo@v2
        with:
          # The Hugo version to download (if necessary) and use. Example: 0.58.2
          hugo-version: latest
          # Download (if necessary) and use Hugo extended version. Example: true
          extended: true

      - name: Build
        run: |
          hugo --gc --minify

      - name: Deploy
        uses: peaceiris/actions-gh-pages@v3
        with:
          github_token: ${{ secrets.GITHUB_TOKEN }}
          publish_dir: ./public

      - name: Scan public keys
        run: |
          ssh-keyscan ${{ secrets.BLOG_DEPLOY_HOST }} >> ~/.ssh/known_hosts
      - name: Copy
        run: |
          rsync -av --delete public/ root@${{ secrets.BLOG_DEPLOY_HOST }}:/root/Hugo/html/
注:
一、在 VPS 上生成一个专用的密钥对用作与 Github 进行交互;
ssh-keygen -t ed25519 -C "Github" -f /root/.ssh/id_ed25519_github为了方便连接,使用空密码即可,所以输入上述命令后一直回车确认即可。
root@US-DC2:~# ll .ssh
total 24
drwx------ 2 root root 4096 Feb 29 13:26 ./
drwx------ 9 root root 4096 Feb 29 13:17 ../
-rw------- 1 root root    0 Aug  3  2022 authorized_keys
-rw------- 1 root root  399 Feb 29 13:21 id_ed25519
-rw------- 1 root root  411 Feb 29 13:26 id_ed25519_github
-rw-r--r-- 1 root root   96 Feb 29 13:26 id_ed25519_github.pub
-rw-r--r-- 1 root root   88 Feb 29 13:21 id_ed25519.pub
id_ed25519_github 为刚刚生成的专用私钥,id_ed25519_github.pub 为刚刚生成的专用公钥。
将公钥追加到 authorized_keys 里
cat id_ed25519_github.pub >> ~/.ssh/authorized_keys二、在 Github 仓库上设置 BLOG_DEPLOY_KEY 与 BLOG_DEPLOY_HOST;
这两项为安全性设置,试着如果将私钥与 VPS 的 IP 直接暴露在 hugo.yml 文件里的话,多少有点不合适。
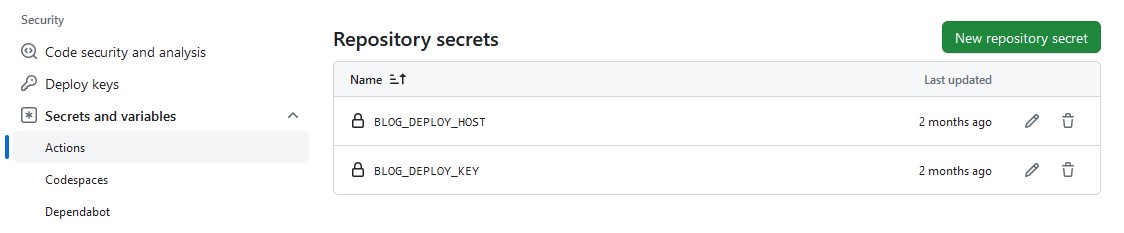
仓库 Settings -> Security -> Actions -> New repository secret
Name: BLOG_DEPLOY_KEY
Secret: 填入刚才在 VPS 上生成的 id_ed25519_github 私钥里的内容,该内容以 -----BEGIN OPENSSH PRIVATE KEY----- 开关,并以 -----END OPENSSH PRIVATE KEY----- 结尾。
Name: BLOG_DEPLOY_HOST
Secret: 填入 VPS 的 IP 地址
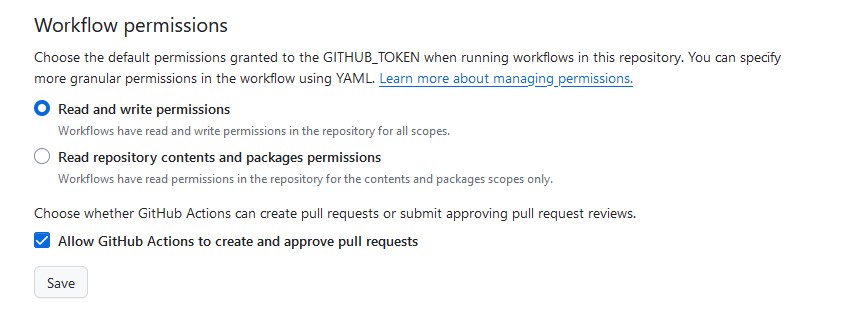
三、打开 Github 仓库的 Workflows 权限;
仓库 Settings -> Actions -> General -> Workflow permissions -> 选择 Read and write permissions 并勾选 Allow Github Actions to create and approve pull requests
结语
这只是一个简单的工作流,具体的流程大概是这样的,当我们推送代码或博客文章到绑定的 Github 仓库 main 分支时就会触发工作流,接着就会在精简的 Ubuntu 系统上使用相关的工具进行构建 Hugo 静态博客并使用 Rsync 进行传输到 VPS 下的 /root/Hugo/html/ 目录。
因为只是案例演示,所以最终还得根据自己项目的需求进行配置工作流。以上演示的工具均常用工具,很多玩 Hugo 静态博客的人应该都曾接触过。估计也就唯独 webfactory/ssh-agent 用得人会少一点,据了解,很大一部分静态博客博主是在 VPS 上使用 WebHook 来拉取保存在 Github 上的文件。
无论使用哪种方法,只要目的达到了就行。懂得灵活变通才是最重要的!